实训笔记 SpringMVC Note
MVC概念
MVC是模型(Model)、视图(View)、控制器(Controller)的简写,是一种软件设计规范。
将业务逻辑、数据、显示分离的方式来组织代码。
主要作用是降低了视图与业务逻辑间的双向耦合 。
MVC不是一种设计模式,MVC是一种架构模式 。注:不同的MVC存在差异。
**Model(模型)**:数据模型,提供要展示的数据,包含数据和行为,可以认为是领域模型或JavaBean组件(包含数据和行为),不过现在都分离为:Value Object(数据Dao)和服务层(行为Service)。也就是模型提供了模型查询和模型数据的状态更新功能,包括数据和业务。
**View(视图)**:负责进行模型的展示,一般为我们见到的用户界面,客户所想看到的东西。
**Controller(控制器)**:接收用户请求,委托给模型进行处理(状态改变),处理完毕后把返回的模型数据返回给视图,由视图负责展示。也就是说控制器完成了调度员的工作。
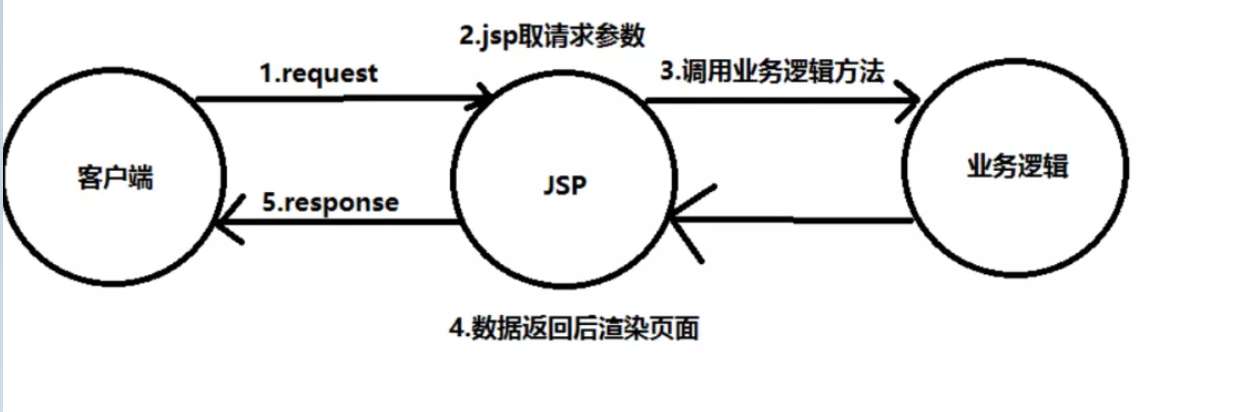
Model1时代
Model1优点:架构简单,比较适合小型项目开发;
Model1缺点:JSP职责不单一,职责过重,不便于维护;
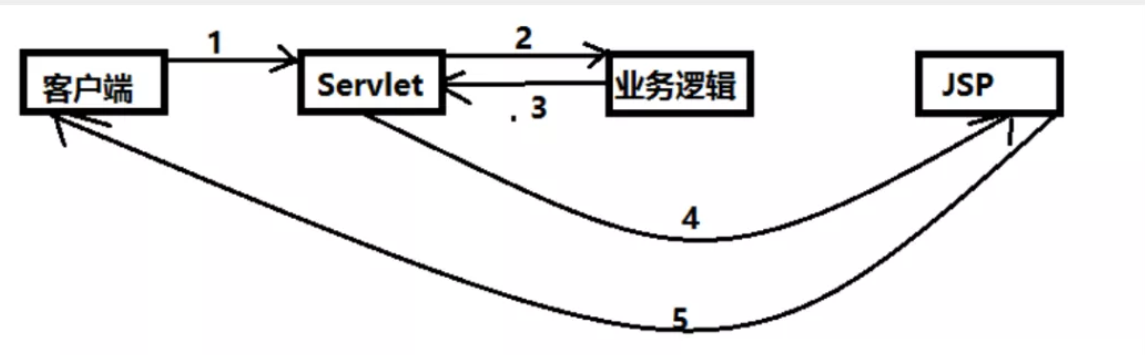
Model2时代 Model2把一个项目分成三部分,包括视图、控制、模型。
用户发请求
Servlet接收请求数据,并调用对应的业务逻辑方法
业务处理完毕,返回更新后的数据给servlet
servlet转向到JSP,由JSP来渲染页面
响应给前端更新后的页面
Java Web回顾 引入依赖 1 2 3 4 5 6 7 8 9 10 11 12 13 14 15 <dependency > <groupId > javax.servlet</groupId > <artifactId > javax.servlet-api</artifactId > <version > 3.0.1</version > </dependency > <dependency > <groupId > javax.servlet</groupId > <artifactId > jstl</artifactId > <version > 1.2</version > </dependency > <dependency > <groupId > javax.servlet.jsp</groupId > <artifactId > jsp-api</artifactId > <version > 2.2</version > </dependency >
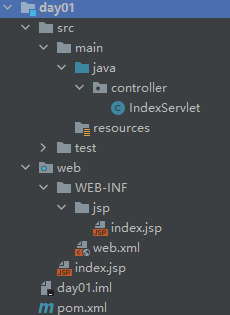
创建对应项目结构
编写Servlet 1 2 3 4 5 6 7 8 9 10 11 12 13 14 15 16 17 18 19 20 21 22 23 24 25 26 27 28 29 package controller;import javax.servlet.*;import javax.servlet.annotation.WebServlet;import javax.servlet.http.*;import java.io.IOException;@WebServlet(urlPatterns = "/my") public class IndexServlet extends HttpServlet { @Override protected void doGet (HttpServletRequest request, HttpServletResponse response) throws ServletException, IOException { String method = request.getParameter("method" ); if ("add" .equals(method)){ request.setAttribute("msg" ,"执行了" +method+"方法" ); } if ("delete" .equals(method)){ request.setAttribute("msg" ,"执行了" +method+"方法" ); } request.getRequestDispatcher("/WEB-INF/jsp/index.jsp" ).forward(request,response); } @Override protected void doPost (HttpServletRequest request, HttpServletResponse response) throws ServletException, IOException { doGet(request,response); } }
修改web.xml 1 2 3 4 5 6 7 8 9 10 11 12 13 14 15 16 <?xml version="1.0" encoding="UTF-8" ?> <web-app xmlns ="http://xmlns.jcp.org/xml/ns/javaee" xmlns:xsi ="http://www.w3.org/2001/XMLSchema-instance" xsi:schemaLocation ="http://xmlns.jcp.org/xml/ns/javaee http://xmlns.jcp.org/xml/ns/javaee/web-app_4_0.xsd" version ="4.0" > <servlet > <servlet-name > IndexServlet</servlet-name > <servlet-class > controller.IndexServlet</servlet-class > </servlet > <servlet-mapping > <servlet-name > IndexServlet</servlet-name > <url-pattern > /my</url-pattern > </servlet-mapping > </web-app >
再将项目发布到Tomcat上,即可在 localhost:8080/my访问Servlet,通过/my?method=add/delete,即可传入参数
MVC框架要做的事情
将url映射到Java类或Java类的方法
封装用户提交的数据
处理请求 – 调用相关的业务处理 – 封装响应数据
将响应数据进行渲染
SpringMVC SpringMVC是Spring Framework的一部分,是基于Java实现MVC的轻量级Web框架
SpringMVC优点
轻量级,易上手
高效,基于请求响应的MVC框架
与Spring兼容性好,无缝结合
约定优于配置
功能强大:RESTful、数据验证、格式化、本地化、主题等
简洁灵活
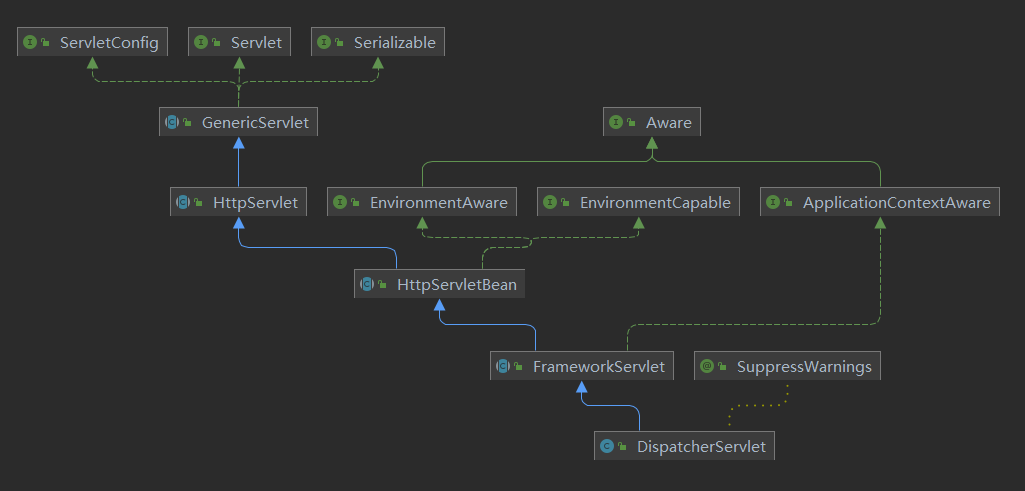
Spring的Web框架围绕*DispatcherServlet [调度Servlet]设计*
中心调度器 DispatcherServlet的作用是将请求分发到不同的处理器。从Spring 2.5开始,使用Java 5或者以上版本的用户可以采用基于注解形式进行开发,十分简洁
Spring MVC框架像许多其他MVC框架一样, 以请求为驱动 , 围绕一个中心Servlet分派请求及提供其他功能 ,**DispatcherServlet是一个实际的Servlet (它继承自HttpServlet 基类)**。
SpringMVC执行原理
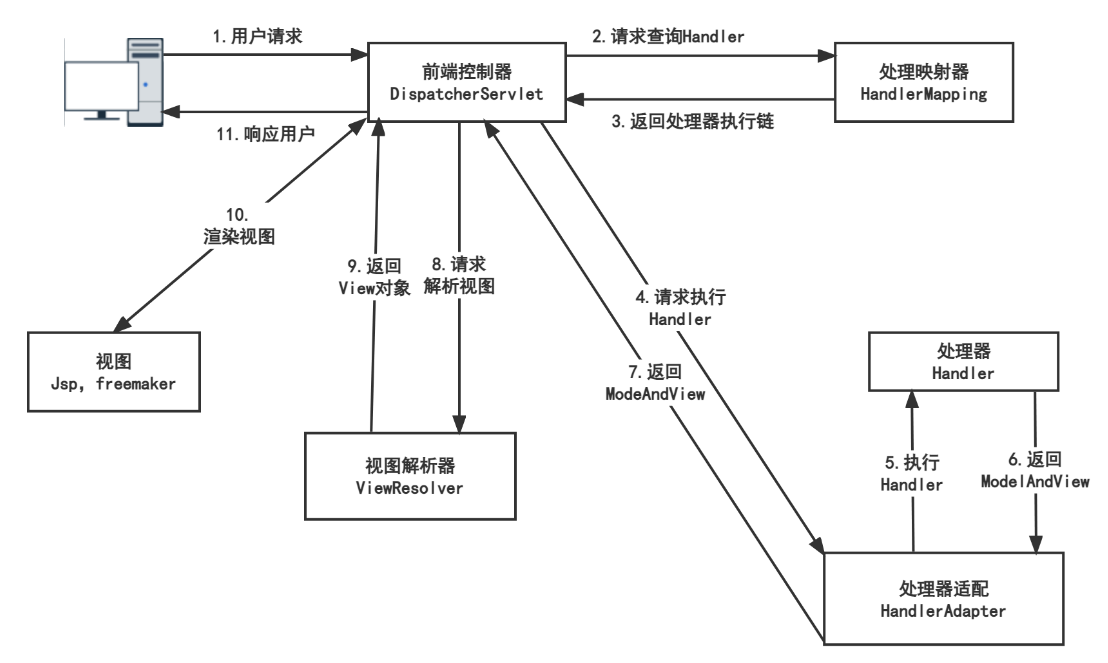
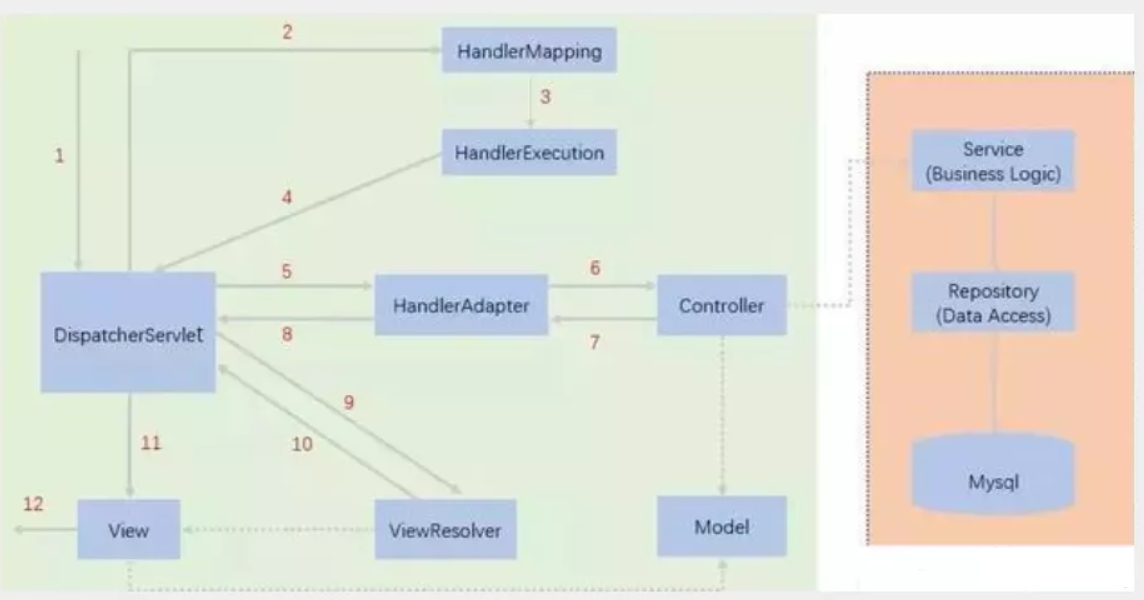
流程:
用户请求首先被DispatcherServlet拦截
DispatcherServelt在HandlerMapping寻找对应Handler
HandlerMapping返回具体处理器执行链
DIspatcherServlet再通过HandlerAdapter寻找指定Handler
Handler执行完具体逻辑
Handler返回ModelAndView给HandlerAdapter
通过HandlerAdapter返回给DispatcherServlet
DispatcherServlet请求ViewResolver
ViewResolver将view对象完整路径返回
DIspatcherServlet将model数据渲染至视图
返回给用户。
DispatcherServlet :前置控制器,SpringMVC控制中心,接收/拦截用户所有请求
HandlerMapping :处理器映射器,根据请求url查找Handler,返回HandlerExecutionChain
HandlerAdapter :处理器适配器,按照特点规则执行Handler
ViewResolver :返回视图逻辑名
SpringMVC使用入门 基于配置
首先是在web.xml配置DispacherServlet
1 2 3 4 5 6 7 8 9 10 11 12 13 14 15 16 17 18 19 20 21 22 23 24 25 26 27 28 29 <?xml version="1.0" encoding="UTF-8" ?> <web-app xmlns ="http://xmlns.jcp.org/xml/ns/javaee" xmlns:xsi ="http://www.w3.org/2001/XMLSchema-instance" xsi:schemaLocation ="http://xmlns.jcp.org/xml/ns/javaee http://xmlns.jcp.org/xml/ns/javaee/web-app_4_0.xsd" version ="4.0" > <servlet > <servlet-name > springmvc</servlet-name > <servlet-class > org.springframework.web.servlet.DispatcherServlet</servlet-class > <init-param > <param-name > contextConfigLocation</param-name > <param-value > classpath:springmvc-servlet.xml</param-value > </init-param > <load-on-startup > 1</load-on-startup > </servlet > <servlet-mapping > <servlet-name > springmvc</servlet-name > <url-pattern > /</url-pattern > </servlet-mapping > </web-app >
2. 编写springmvc-servlet.xml
注入HandlerMapping
注入HandlerAdapter
注入ViewResolver
注入Handler id则指明了请求url(编写实现Controller接口后的类后注入)
1 2 3 4 5 6 7 8 9 10 11 12 13 14 15 16 17 18 19 20 21 22 23 <?xml version="1.0" encoding="UTF-8" ?> <beans xmlns ="http://www.springframework.org/schema/beans" xmlns:xsi ="http://www.w3.org/2001/XMLSchema-instance" xmlns:context ="http://www.springframework.org/schema/context" xmlns:mvc ="http://www.springframework.org/schema/mvc" xsi:schemaLocation ="http://www.springframework.org/schema/beans http://www.springframework.org/schema/beans/spring-beans.xsd http://www.springframework.org/schema/context https://www.springframework.org/schema/context/spring-context.xsd http://www.springframework.org/schema/mvc https://www.springframework.org/schema/mvc/spring-mvc.xsd" > <bean class ="org.springframework.web.servlet.handler.BeanNameUrlHandlerMapping" /> <bean class ="org.springframework.web.servlet.mvc.SimpleControllerHandlerAdapter" /> <mvc:annotation-driven /> <bean id ="internalResourceViewResolver" class ="org.springframework.web.servlet.view.InternalResourceViewResolver" > <property name ="prefix" value ="/WEB-INF/jsp/" /> <property name ="suffix" value =".jsp" /> </bean > <bean id ="/hello" class ="controller.HelloController" /> </beans >
3. 编写Controller
1 2 3 4 5 6 7 8 9 10 11 12 13 14 15 16 package controller;import org.springframework.stereotype.Controller;import org.springframework.ui.Model;import org.springframework.web.bind.annotation.RequestMapping;public class HelloController implements Controller { @Override public ModelAndView handleRequest (HttpServletRequest request, HttpServletResponse response) throws Exception { ModelAndView mv = new ModelAndView (); mv.addObject("msg" ,"哈喽呀" ); mv.setViewName("hello" ); return mv; } }
可以看到 MV.setViewName(“Hello”),而Hello则通过HandlerAdapter返回给DispatcherServlet,DIspatcherServlet将通过ViewReslover处理后获得最终视图名 /WEB-INF/jsp/hello.jsp
我们在WEB-INF/jsp编写jsp页面
1 2 3 4 5 6 7 8 9 <%@ page contentType="text/html;charset=UTF-8" language="java" %> <html> <head> <title>Title</title> </head> <body> ${msg} </body> </html>
将项目发布至tomcat,访问 localhost:8080/hello,我们将看到由DispatcherServlet根据Model渲染后的Html页面
基于注解
在web.xml中配置DispatcherServlet,与上文相同
编写springmvc-servlet.xml
1 2 3 4 5 6 7 8 9 10 11 12 13 14 15 16 17 18 19 <?xml version="1.0" encoding="UTF-8" ?> <beans xmlns ="http://www.springframework.org/schema/beans" xmlns:xsi ="http://www.w3.org/2001/XMLSchema-instance" xmlns:context ="http://www.springframework.org/schema/context" xmlns:mvc ="http://www.springframework.org/schema/mvc" xsi:schemaLocation ="http://www.springframework.org/schema/beans http://www.springframework.org/schema/beans/spring-beans.xsd http://www.springframework.org/schema/context https://www.springframework.org/schema/context/spring-context.xsd http://www.springframework.org/schema/mvc https://www.springframework.org/schema/mvc/spring-mvc.xsd" > <context:component-scan base-package ="controller" /> <mvc:default-servlet-handler /> <mvc:annotation-driven /> <bean id ="internalResourceViewResolver" class ="org.springframework.web.servlet.view.InternalResourceViewResolver" > <property name ="prefix" value ="/WEB-INF/jsp/" /> <property name ="suffix" value =".jsp" /> </bean > </beans >
编写Controller
1 2 3 4 5 6 7 8 9 10 11 12 13 14 15 16 17 package controller;import org.springframework.stereotype.Controller;import org.springframework.ui.Model;import org.springframework.web.bind.annotation.RequestMapping;@Controller @RequestMapping("/HelloController") public class HelloController { @RequestMapping("/hello") public String show (Model model) { model.addAttribute("msg" ,"哈喽啊!!" ); return "hello" ; } }
通过localhost:8080/HelloController/hello即可访问,在类上附加@RequestMapping,会使得类内所有方法RequestMapping再附加当前类RequestMapping
总结 DispatcherServlet需要我们手动配置,而HandlerMapping与HandlerAdapter只需要我们注入即可,而ViewResolve需要我们根据具体配置注入时写明属性。
RESTful与Controller 什么是RESTful风格 RESTFUL是一种网络应用程序的设计风格和开发方式
通过POST、DELETE、PUT、GET,根据不同请求方法,虽然请求的url相同,但处理的接口是不同。
示例 传统方式操作资源 :通过不同的参数来实现不同的效果 方法单一,post 和 get
使用RESTful操作资源 :可以通过不同的请求方式来实现不同的效果
SpringMVC中RESTful风格 通过**@PathVariable**注解实现在url取出对应值
通过**@RequestMapping或组合注解**指定请求方法
相关注解 接口映射注解 @RequestMapping 在@RequestMapping注解中,value指定url,method指定方法。
1 2 3 4 5 6 7 8 @Controller public class MyController { @RequestMapping(value = "/test/{a}",method = RequestMethod.GET) public String testGet (Model model, @PathVariable int a) { model.addAttribute("msg" ,"传入get" +a); return "demo1" ; } }
组合注解 method已指定
@GetMapping
@PostMapping
@PutMapping
@DeleteMapping
@PatchMapping
参数注解 @PathVariable 在请求url部分使用\{}占位,既可以在方法参数列表中取得
可以使用@PathVariable(a) 指定方法参数与\{b}占位变量对应
1 2 3 4 5 6 7 8 @Controller public class MyController { @RequestMapping(value = "/test/{a}",method = RequestMethod.POST) public String testPost (Model model, @PathVariable int a) { model.addAttribute("msg" ,"传入post" +a); return "demo1" ; } }
@RequestParam 使用@RequestParam(name) 指定传入参数名与方法参数名的对应
1 2 3 4 5 6 7 8 @Controller public class MyController { @GetMapping("/param1") public String testParm1 (@RequestParam("user_id") int id) { System.out.println(id); return "model1" ; } }
页面跳转 根据上文,我们可以知道在SpringMVC中存在ViewResolve,他会对一个页面名字进行拼接,再返回页面具体位置
1 2 3 4 5 <bean id ="internalResourceViewResolver" class ="org.springframework.web.servlet.view.InternalResourceViewResolver" > <property name ="prefix" value ="/WEB-INF/jsp/" /> <property name ="suffix" value =".jsp" /> </bean >
Model跳转 1 2 3 4 5 6 7 8 9 10 @Controller @RequestMapping("/HelloController") public class HelloController { @RequestMapping("/hello") public String show (Model model) { model.addAttribute("msg" ,"哈喽啊!!" ); return "hello" ; } }
return的字符串即为返回给ViewResolve的页面名
ModelAndView跳转 1 2 3 4 5 6 7 8 9 10 11 12 13 14 15 16 package controller;import org.springframework.stereotype.Controller;import org.springframework.ui.Model;import org.springframework.web.bind.annotation.RequestMapping;public class HelloController implements Controller { @Override public ModelAndView handleRequest (HttpServletRequest request, HttpServletResponse response) throws Exception { ModelAndView mv = new ModelAndView (); mv.addObject("msg" ,"哈喽呀" ); mv.setViewName("hello" ); return mv; } }
mv.setViewName 即设置了页面名返回给ViewResolve
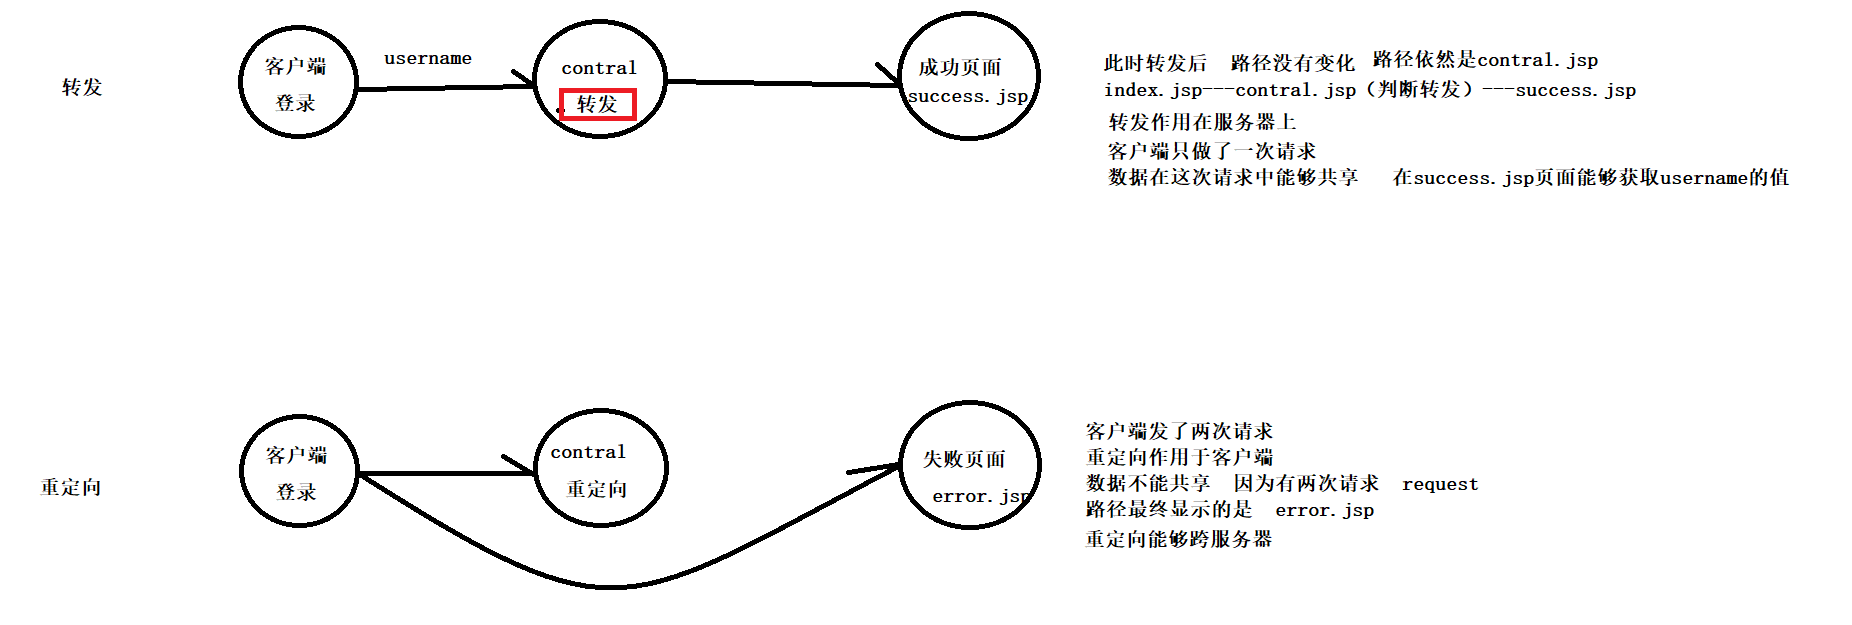
重定向与转发 重定向与转发的区别
request.getRequestDispatcher(“index.jsp”).forward(request,response); //转发方式
response.sendRedirect(“index.jsp”); //重定向
客户端是无法直接访问WEB-INF下的jsp页面,重定向等于重新访问url,所以只能通过转发来访问。
SpringMVC中的重定向与转发 当我们没有配置ViewResolve,页面以return方式进行返回
return “forward:xxx” 转发至/xxx
return “xxxx” 转发至/xxx
return “redirect:xxx” 重定向至/xxx
当我们配置ViewResolve后,则会发生变化
return “forward:xxx” 转发至/xxx
return “xxxx” 转发至经过ViewResolve处理过后具体xx/(xxx)xx
return “redirect:xxx” 重定向至/xxx
1 2 3 4 5 6 7 8 9 10 11 12 13 14 15 16 17 18 19 20 @RequestMapping(value = "/testMVC1",method = RequestMethod.GET) public String testMVC1 (Model model) { return "redirect:index.jsp" ; } @RequestMapping(value = "/testMVC2",method = RequestMethod.GET) public String testMVC2 (Model model) { return "redirect:testMVC3" ; } @RequestMapping(value = "/testMVC3",method = RequestMethod.GET) public String testMVC3 (Model model) { return "hello" ; } @RequestMapping(value = "/testMVC4",method = RequestMethod.GET) public String testMVC4 (Model model) { return "forward:index.jsp" ; }
数据处理 数据处理 当提交的域名称与请求参数一致 自动取得对应值
1 2 3 4 5 @GetMapping("/param3") public String testParm3 (int id) { System.out.println(id); return "demo1" ; }
当提交的域名称与请求参数不一致 通过@RequestParam取得对应值
1 2 3 4 5 @GetMapping("/param1") public String testParm1 (@RequestParam("user_id") int id) { System.out.println(id); return "model1" ; }
传入对象 前端传递的参数名和对象名必须一致,否则为null。
1 2 3 4 5 @GetMapping("/param2") public String testParm2 (User user) { System.out.println(user); return "model1" ; }
前端展示 ModelAndView 实现了Controller接口,可以设置视图名称
1 2 3 4 5 6 7 8 9 10 public class HelloController implements Controller { @Override public ModelAndView handleRequest (HttpServletRequest request, HttpServletResponse response) throws Exception { ModelAndView mv = new ModelAndView (); mv.addObject("msg" ,"哈喽呀" ); mv.setViewName("hello" ); return mv; } }
ModelMap 1 2 3 4 5 6 7 @RequestMapping(value = "/demo1",method = RequestMethod.POST) public String demo01 (String username, ModelMap modelMap) { System.out.println(username); modelMap.addAttribute("username" ,username); return "demo1" ; }
Model 1 2 3 4 5 6 @RequestMapping("/hello") public String show (Model model) { model.addAttribute("msg" ,"哈喽啊!!" ); return "hello" ; }
对比 1 2 3 4 5 6 7 Model 继承了ModelMap类,当他接收了List后,实际上为ModelMap ModelMap 继承了 LinkedMap ,除了实现了自身的一些方法,同样的继承 LinkedMap 的方法和特性; ModelAndView 可以在储存数据的同时,可以进行设置返回的逻辑视图,进行控制展示层的跳转。 1. 通过 New ModelAndView() 创建新的对象时指定 2. 对当前ModelAndView对象 调用SetViewName()方法指定
乱码问题 1 2 3 4 5 6 7 8 9 10 11 12 13 14 15 1.数据库 jdbc:mysql://localhost:3306/mybatis?characterEncoding=utf8 2.页面头部 <%@ page contentType="text/html;charset=UTF-8" language="java" %> 3.tomcat8以下,8以上的版本tomcat已经自动解决get乱码的问题了 tomcat的 server.xml文件 <Connector port ="8080" protocol ="HTTP/1.1" connectionTimeout ="20000" redirectPort ="8443" URIEncoding ="utf-8" /> 4.request: 获取参数之前:request.setCharacterEncoding("utf-8"); 5.response: response.setCharacterEncoding("utf-8"); response.setContentType(“text/html;"charset=utf-8"); web后期学习阶段 Filter 过滤器解决编码问题 相当于过滤所有的请求
控制台乱码 在IDEA中为Tomcat设置VM options
-Dfile.encoding=UTF-8
还可以在tomcat所在conf文件夹中修改server.xml与logging.properties中指定的编码格式
返回页面中取值乱码 方式一:设置Filter 1 2 3 4 5 6 7 8 9 10 11 12 13 14 15 16 17 18 19 20 21 22 23 package com.day02.filter;import javax.servlet.*;import java.io.IOException;public class MyFilter implements Filter { @Override public void init (FilterConfig filterConfig) throws ServletException { } @Override public void doFilter (ServletRequest servletRequest, ServletResponse servletResponse, FilterChain filterChain) throws IOException, ServletException { servletResponse.setContentType("text/html;charset=UTF-8" ); servletRequest.setCharacterEncoding("utf-8" ); servletResponse.setCharacterEncoding("utf-8" ); filterChain.doFilter(servletRequest,servletResponse); } @Override public void destroy () { } }
在web.xml注册FIlter
1 2 3 4 5 6 7 8 9 10 11 12 13 14 15 16 17 18 19 20 21 22 23 24 25 26 27 <?xml version="1.0" encoding="UTF-8" ?> <web-app xmlns ="http://xmlns.jcp.org/xml/ns/javaee" xmlns:xsi ="http://www.w3.org/2001/XMLSchema-instance" xsi:schemaLocation ="http://xmlns.jcp.org/xml/ns/javaee http://xmlns.jcp.org/xml/ns/javaee/web-app_4_0.xsd" version ="4.0" > <servlet > <servlet-name > springMvc</servlet-name > <servlet-class > org.springframework.web.servlet.DispatcherServlet</servlet-class > <init-param > <param-name > contextConfigLocation</param-name > <param-value > classpath:springmvcContext.xml</param-value > </init-param > <load-on-startup > 1</load-on-startup > </servlet > <servlet-mapping > <servlet-name > springMvc</servlet-name > <url-pattern > /</url-pattern > </servlet-mapping > <filter > <filter-name > MyFilter</filter-name > <filter-class > com.day02.filter.MyFilter</filter-class > </filter > <filter-mapping > <filter-name > MyFilter</filter-name > <url-pattern > /*</url-pattern > </filter-mapping > </web-app >
这样就会对Request与Response中的数据设置了编码格式,当然SpringMVC已经为我们提前准备了过滤器。
方式二:使用Spring提供的字符编码过滤器 1 2 3 4 5 6 7 8 9 10 11 12 13 14 15 16 17 18 19 20 21 22 23 24 25 26 27 28 29 30 31 32 <?xml version="1.0" encoding="UTF-8" ?> <web-app xmlns ="http://xmlns.jcp.org/xml/ns/javaee" xmlns:xsi ="http://www.w3.org/2001/XMLSchema-instance" xsi:schemaLocation ="http://xmlns.jcp.org/xml/ns/javaee http://xmlns.jcp.org/xml/ns/javaee/web-app_4_0.xsd" version ="4.0" > <servlet > <servlet-name > springMvc</servlet-name > <servlet-class > org.springframework.web.servlet.DispatcherServlet</servlet-class > <init-param > <param-name > contextConfigLocation</param-name > <param-value > classpath:springmvcContext.xml</param-value > </init-param > <load-on-startup > 1</load-on-startup > </servlet > <servlet-mapping > <servlet-name > springMvc</servlet-name > <url-pattern > /</url-pattern > </servlet-mapping > <filter > <filter-name > encoding</filter-name > <filter-class > org.springframework.web.filter.CharacterEncodingFilter</filter-class > <init-param > <param-name > encoding</param-name > <param-value > UTF-8</param-value > </init-param > </filter > <filter-mapping > <filter-name > encoding</filter-name > <url-pattern > /*</url-pattern > </filter-mapping > </web-app >
JSON交互处理 JSON的优点
JSON(JavaScript Object Notation, JS 对象标记) 是一种轻量级的数据交换格式,目前使用特别广泛。
采用完全独立于编程语言的文本格式 来存储和表示数据。
简洁和清晰的层次结构使得 JSON 成为理想的数据交换语言。
易于人阅读和编写,同时也易于机器解析和生成,并有效地提升网络传输效率。
返回数据给前端
后端代码
1 2 3 4 5 6 7 8 9 10 11 12 13 14 15 package com.day02.controller;import org.springframework.stereotype.Controller;import org.springframework.web.bind.annotation.RequestMapping;import org.springframework.web.bind.annotation.RequestMethod;import org.springframework.web.bind.annotation.ResponseBody;@Controller public class MyController2 { @RequestMapping(value = "/jsonDemo",method = RequestMethod.GET) @ResponseBody public String demo2 () { return "[{\"id\":\"1\",\"name\":\"中国\"},{\"id\":\"2\",\"name\":\"美国\"},{\"id\":\"3\",\"name\":\"日本\"}]" ; } }
在这里我们使用了@ResponseBody注解,方法返回值则不会被ViewResolve处理,而是直接以字符串的形式进行返回,@ResponseBody也可以对整个类进行标记。
Spring同样提供了组合注解@RestController,使用RestController标注的类,不仅仅会被注册进Spring容器,这个类内所有的方法,都会以字符串形式返回给前端。
前端接收
1 2 3 4 5 6 7 8 9 10 11 12 13 14 15 16 17 18 19 20 21 22 23 24 25 26 $(function ( $("#btn" ).click (function ( var select = $("[name=country]" ) $.ajax ({ type :'post' , url : "/jsonDemo" , data : {}, success :function (result ) { var json = JSON .parse (result) $.each (json,function (index,jsonObj ) { select.append ("<option value=" +jsonObj.id +">" +jsonObj.name +"</option>" ) }) console .log (json) } }) }) })
JavaScript中对象与json字符串的转换
json字符串转换为JavaScript对象
1 2 var json = JSON .parse ('{"a": "Hello", "b": "World"}' );
JavaScript对象转换为字符串
1 2 var json = JSON .stringify ({a : 'Hello' , b : 'World' });
返回数据时乱码问题 方式一 修改@RequstMapping属性
这种方式指定了返回类型,所以Ajax中的回调函数不需要再把返回值处理为JavaScript对象
1 2 @RequestMapping(value = "/json1",produces = "application/json;charset=utf-8")
方式二 注册StringHttpMessageConverter
1 2 3 4 5 6 7 8 9 10 11 12 13 14 15 16 17 18 19 20 21 22 23 24 25 26 27 28 <?xml version="1.0" encoding="UTF-8" ?> <beans xmlns ="http://www.springframework.org/schema/beans" xmlns:xsi ="http://www.w3.org/2001/XMLSchema-instance" xmlns:context ="http://www.springframework.org/schema/context" xmlns:mvc ="http://www.springframework.org/schema/mvc" xsi:schemaLocation ="http://www.springframework.org/schema/beans http://www.springframework.org/schema/beans/spring-beans.xsd http://www.springframework.org/schema/context https://www.springframework.org/schema/context/spring-context.xsd http://www.springframework.org/schema/mvc https://www.springframework.org/schema/mvc/spring-mvc.xsd" > <context:component-scan base-package ="com.day02" /> <mvc:default-servlet-handler /> <mvc:annotation-driven > <mvc:message-converters register-defaults ="true" > <bean class ="org.springframework.http.converter.StringHttpMessageConverter" > //方式一:构造器注入DefaultCharset,会调用父类构造器 <constructor-arg value ="UTF-8" /> //方式二:Set注入defaultCharset,调用父类set方法 <property name ="defaultCharset" value ="UTF-8" /> </bean > </mvc:message-converters > </mvc:annotation-driven > <bean class ="org.springframework.web.servlet.view.InternalResourceViewResolver" > <property name ="prefix" value ="/WEB-INF/jsp/" /> <property name ="suffix" value =".jsp" /> </bean > </beans >
如何返回JSON字符串 Jackson 1 2 3 4 5 <dependency > <groupId > com.fasterxml.jackson.core</groupId > <artifactId > jackson-databind</artifactId > <version > 2.13.3</version > </dependency >
示例:
1 2 3 4 5 6 7 8 9 10 public String demo4 () throws JsonProcessingException { List<User> users = new ArrayList <>(); users.add(new User (1 ,"湖北" )); users.add(new User (2 ,"河北" )); users.add(new User (3 ,"北京" )); users.add(new User (4 ,"河南" )); ObjectMapper objectMapper = new ObjectMapper (); String s = objectMapper.writeValueAsString(users); return s; }
FastJson 1 2 3 4 5 <dependency > <groupId > com.alibaba</groupId > <artifactId > fastjson</artifactId > <version > 1.2.79</version > </dependency >
示例:
1 2 3 4 5 6 7 8 9 public String getSheng (Model model) { List<Sheng> shengs = new ArrayList <>(); shengs.add(new Sheng (1 ,"湖北省" )); shengs.add(new Sheng (2 ,"河北" )); shengs.add(new Sheng (3 ,"北京" )); shengs.add(new Sheng (4 ,"河南" )); model.addAttribute("shengs" ,shengs); return JSON.toJSONString(shengs); }
FastJson还提供了许多方法,方法名字非常直观
1 2 3 4 5 6 7 8 9 10 11 12 13 14 15 16 17 18 19 20 21 22 23 24 25 26 27 28 29 30 31 32 33 34 35 36 37 package com. controller;import com.alibaba.fastjson.JSON;import com.alibaba.fastjson.JSONObject;import com. pojo.User;import java.util.ArrayList;import java.util.List;public class FastJsonDemo { public static void main (String[] args) { User user1 = new User ("长江1号" , 3 , "男" ); User user2 = new User ("长江2号" , 3 , "男" ); User user3 = new User ("长江3号" , 3 , "男" ); User user4 = new User ("长江4号" , 3 , "男" ); List<User> list = new ArrayList <User>(); list.add(user1); list.add(user2); list.add(user3); list.add(user4); System.out.println("*******Java对象 转 JSON字符串*******" ); String str1 = JSON.toJSONString(list); String str2 = JSON.toJSONString(user1); System.out.println("\n****** JSON字符串 转 Java对象*******" ); User jp_user1=JSON.parseObject(str2,User.class); System.out.println("\n****** Java对象 转 JSON对象 ******" ); JSONObject jsonObject1 = (JSONObject) JSON.toJSON(user2); System.out.println("\n****** JSON对象 转 Java对象 ******" ); User to_java_user = JSON.toJavaObject(jsonObject1, User.class); } }
Ajax使用 Ajax简介
AJAX = Asynchronous JavaScript and XML(异步的 JavaScript 和 XML)。
AJAX 是一种在无需重新加载整个网页的情况下,能够更新部分网页的技术。
Ajax 不是一种新的编程语言,而是一种用于创建更好更快以及交互性更强的Web应用程序的技术。
传统的网页(即不用ajax技术的网页),想要更新内容或者提交一个表单,都需要重新加载整个网页。
使用ajax技术的网页,通过在后台服务器进行少量的数据交换,就可以实现异步局部更新。
使用Ajax,用户可以创建接近本地桌面应用的直接、高可用、更丰富、更动态的Web用户界面。
Jquery Ajax jQuery 库拥有完整的 Ajax 兼容套件。其中的函数和方法允许我们在不刷新浏览器的情况下从服务器加载数据,主要就是方便。。。
Ajax 1 2 3 4 5 6 7 8 9 10 11 12 13 14 15 16 17 18 19 20 21 22 $.ajax ({ 部分参数: url:请求地址 type:请求方式,GET 、POST (1.9 .0 之后用method) headers:请求头 data:要发送的数据 contentType:即将发送信息至服务器的内容编码类型(默认: "application/x-www-form-urlencoded; charset=UTF-8" ) async :是否异步 timeout:设置请求超时时间(毫秒) beforeSend:发送请求前执行的函数(全局) complete:完成之后执行的回调函数(全局) success:成功之后执行的回调函数(全局) error:失败之后执行的回调函数(全局) accepts:通过请求头发送给服务器,告诉服务器当前客户端可接受的数据类型 dataType:将服务器端返回的数据转换成指定类型 "xml" : 将服务器端返回的内容转换成xml格式 "text" : 将服务器端返回的内容转换成普通文本格式 "html" : 将服务器端返回的内容转换成普通文本格式,在插入DOM 中时,如果包含JavaScript 标签,则会尝试去执行。 "script" : 尝试将返回值当作JavaScript 去执行,再将服务器端返回的内容转换成普通文本格式 "json" : 将服务器端返回的内容转换成相应的JavaScript 对象 "jsonp" : JSON P 格式使用 JSON P 形式调用函数时,如 "myurl?callback=?" jQuery 将自动替换 ? 为正确的函数名,以执行回调函数 })
load 1 2 $('#xx' ).load (url,data,function (response,status,xhr ))
getJSON 1 2 3 4 5 $.getJSON ( url, data, success (data,status,xhr) )
get 1 $.get(url,data,success(response,status,xhr),dataType)
post 1 $.post (url,data,success (data, textStatus, jqXHR),dataType)
示例 示例一 后端返回
1 2 3 4 5 6 7 8 9 10 11 12 13 14 15 16 17 18 19 20 21 22 23 24 25 26 27 28 29 30 31 32 33 34 35 36 37 38 39 40 41 42 43 44 45 46 47 48 49 50 51 52 53 54 55 56 57 58 59 package com.day02.controller;import com.alibaba.fastjson.JSON;import com.day02.pojo.Sheng;import com.day02.pojo.Shi;import com.day02.pojo.User;import org.springframework.stereotype.Controller;import org.springframework.ui.Model;import org.springframework.web.bind.annotation.RequestMapping;import org.springframework.web.bind.annotation.RequestMethod;import org.springframework.web.bind.annotation.RequestParam;import org.springframework.web.bind.annotation.RestController;import java.util.ArrayList;import java.util.List;@Controller @RequestMapping("/shengshi") public class ShengShiController { @RequestMapping(value = "/sheng",method = RequestMethod.POST) public String getSheng (Model model) { List<Sheng> shengs = new ArrayList <>(); shengs.add(new Sheng (1 ,"湖北省" )); shengs.add(new Sheng (2 ,"河北" )); shengs.add(new Sheng (3 ,"北京" )); shengs.add(new Sheng (4 ,"河南" )); model.addAttribute("shengs" ,shengs); return "forward:/shengshi/sheng.jsp" ; } @RequestMapping(value = "/shi",method = RequestMethod.POST) public String getShi (@RequestParam("sid") int sid,Model model) { List<Shi> shis1 = new ArrayList <>(); shis1.add(new Shi (1 ,"黄冈市" ,1 )); shis1.add(new Shi (2 ,"武汉市" ,1 )); shis1.add(new Shi (3 ,"荆州市" ,1 )); shis1.add(new Shi (4 ,"咸宁市" ,1 )); List<Shi> shis2 = new ArrayList <>(); shis2.add(new Shi (5 ,"长沙市" ,2 )); shis2.add(new Shi (6 ,"常德市" ,2 )); shis2.add(new Shi (7 ,"济南市" ,2 )); List<Shi> shis3 = new ArrayList <>(); shis3.add(new Shi (8 ,"咸宁市" ,3 )); if (sid == 1 ){ return JSON.toJSONString(shis1); }else { if (sid == 2 ) return JSON.toJSONString(shis2); else return JSON.toJSONString(shis3); } } }
前端代码
1 2 3 4 5 6 7 8 9 10 11 12 13 14 15 16 17 18 19 20 21 22 23 24 25 26 27 28 29 30 31 32 33 34 35 36 37 38 39 40 41 42 43 44 45 46 47 48 49 50 <%@ taglib prefix="c" uri="http://java.sun.com/jsp/jstl/core" %> <%-- Created by IntelliJ IDEA. User: 11567 Date: 2022 /7 /1 Time: 14 :15 To change this template use File | Settings | File Templates. --%> <%@ page contentType="text/html;charset=UTF-8" language="java" %> <c:set var ="ctx" value="${pageContext.request.contextPath}" /> <html> <head> <title>Title</title> <script src="/js/jquery-3.6.0.min.js" ></script> <script> $(function () { $.post("/shengshi/sheng" ,{ },function (res) { var selectSheng = $("#sheng" ) $(res).each(function (index,item) { var option = "<option value=\"" +item.id+"\">" +item.name+"</option>" selectSheng.append(option); }) var sid = selectSheng.val() showShi(sid) },"json" ) function showShi (sid) { $.post("/shengshi/shi" ,{ "sid" :sid, },function (res) { $(res).each(function (index,item) { var option = "<option value=\"" +item.id+"\">" +item.name+"</option>" $("#shi" ).append(option); }) },"json" ) } $('#sheng' ).change(function () { $("#shi" ).html("" ) var sid = $(this ).val() showShi(sid) }) }) </script> </head> <body> 省份:<select id="sheng" ></select> 市区: <select id="shi" ></select> </body> </html>
示例二 返回html
1 2 3 4 5 6 7 8 9 10 11 12 13 14 15 16 17 18 19 20 21 22 23 24 25 26 27 28 29 30 31 32 33 34 35 36 37 38 39 40 41 42 43 44 45 46 47 48 49 50 51 52 53 54 55 56 57 package com.day02.controller;import com.alibaba.fastjson.JSON;import com.day02.pojo.Sheng;import com.day02.pojo.Shi;import com.day02.pojo.User;import org.springframework.stereotype.Controller;import org.springframework.ui.Model;import org.springframework.web.bind.annotation.RequestMapping;import org.springframework.web.bind.annotation.RequestMethod;import org.springframework.web.bind.annotation.RequestParam;import org.springframework.web.bind.annotation.RestController;import java.util.ArrayList;import java.util.List;@Controller @RequestMapping("/shengshi") public class ShengShiController { @RequestMapping(value = "/sheng",method = RequestMethod.POST) public String getSheng (Model model) { List<Sheng> shengs = new ArrayList <>(); shengs.add(new Sheng (1 ,"湖北省" )); shengs.add(new Sheng (2 ,"河北" )); shengs.add(new Sheng (3 ,"北京" )); shengs.add(new Sheng (4 ,"河南" )); model.addAttribute("shengs" ,shengs); return "forward:/shengshi/sheng.jsp" ; } @RequestMapping(value = "/shi",method = RequestMethod.POST) public String getShi (@RequestParam("sid") int sid,Model model) { List<Shi> shis1 = new ArrayList <>(); shis1.add(new Shi (1 ,"黄冈市" ,1 )); shis1.add(new Shi (2 ,"武汉市" ,1 )); shis1.add(new Shi (3 ,"荆州市" ,1 )); shis1.add(new Shi (4 ,"咸宁市" ,1 )); List<Shi> shis2 = new ArrayList <>(); shis2.add(new Shi (5 ,"长沙市" ,2 )); shis2.add(new Shi (6 ,"常德市" ,2 )); shis2.add(new Shi (7 ,"济南市" ,2 )); List<Shi> shis3 = new ArrayList <>(); shis3.add(new Shi (8 ,"咸宁市" ,3 )); if (sid == 1 ){ model.addAttribute("shis" ,shis1); }else { if (sid == 2 ) model.addAttribute("shis" ,shis2); else model.addAttribute("shis" ,shis3); } return "forward:/shengshi/shi.jsp" ; } }
返回sheng.jsp
1 2 3 4 5 6 <%@ taglib prefix="c" uri="http://java.sun.com/jsp/jstl/core" %> <%@ page contentType="text/html;charset=UTF-8" language="java" %> <c:forEach items="${shengs}" var ="sheng" > <option value="${sheng.id}" >${sheng.name}</option> </c:forEach>
返回shi.jsp
1 2 3 4 5 6 <%@ taglib prefix="c" uri="http://java.sun.com/jsp/jstl/core" %> <%@ page contentType="text/html;charset=UTF-8" language="java" %> <c:forEach items="${shis}" var ="shi" > <option value="${shi.id}" >${shi.name}</option> </c:forEach>
在上面两个接口,分别返回了jsp页面,通过循环返回了html代码给前端
接收方式一 发送post请求获得返回在进行替换
1 2 3 4 5 6 7 8 9 10 11 12 13 14 15 16 17 18 19 20 21 22 23 24 25 26 27 28 29 30 31 32 33 34 35 36 37 38 39 40 41 42 43 <%@ taglib prefix="c" uri="http://java.sun.com/jsp/jstl/core" %> <%-- Created by IntelliJ IDEA . User : 11567 Date : 2022 /7 /1 Time : 14 :15 To change this template use File | Settings | File Templates . --%> <%@ page contentType="text/html;charset=UTF-8" language="java" %> <c:set var ="ctx" value ="${pageContext.request.contextPath}" /> <html > <head > <title > Title</title > <script src ="/js/jquery-3.6.0.min.js" > </script > <script > $(function ( $.post ("/shengshi/sheng" ,{ },function (res ) { var selectSheng = $("#sheng" ) selectSheng.html (res) var sid = selectSheng.val () showShi (sid) },"html" ) function showShi (sid ){ $.post ("/shengshi/shi" ,{ "sid" :sid, },function (res ) { $('#shi' ).html (res) },"html" ) } $('#sheng' ).change (function ( var sid = $(this ).val () showShi (sid) }) }) </script > </head > <body > 省份:<select id ="sheng" > </select > 市区: <select id ="shi" > </select > </body > </html >
接收方式二 load()直接返送请求将html替换为返回值
1 2 3 4 5 6 7 8 9 10 11 12 13 14 15 16 17 18 19 20 21 22 23 24 25 26 27 28 29 30 31 <%@ taglib prefix="c" uri="http://java.sun.com/jsp/jstl/core" %> <%@ page contentType="text/html;charset=UTF-8" language="java" %> <html > <head > <title > Title</title > <script src ="/js/jquery-3.6.0.min.js" > </script > <script > $(function ( $('#sheng' ).load ("/shengshi/sheng" ,{ },function ( var sid = $('#sheng' ).val () showShi (sid) }) function showShi (sid ){ $('#shi' ).load ("/shengshi/shi" ,{ "sid" :sid, }) } $('#sheng' ).change (function ( var sid = $(this ).val () showShi (sid) }) }) </script > </head > <body > 省份:<select id ="sheng" > </select > 市区: <select id ="shi" > </select > </body > </html >
示例三 模拟用户名检查
后端接收username,模拟查询返回一个json结果
1 2 3 4 5 6 7 8 9 10 11 12 13 14 15 16 @RequestMapping(value = "/jsonDemo5",method = RequestMethod.GET) @ResponseBody public String demo6 (@RequestParam("username") String username) { System.out.println(username); List<User> users = new ArrayList <>(); users.add(new User (1 ,"湖北" )); users.add(new User (2 ,"河北" )); users.add(new User (3 ,"北京" )); users.add(new User (4 ,"河南" )); for (User user : users) { if (user.getName().equals(username)) return "{\"msg\":\"no\"}" ; } return "{\"msg\":\"yes\"}" ; }
前端在input标签设定onblur失焦方法,当失去选中状态,发送请求,再根据返回值在span标签内显示
1 2 3 4 5 6 7 8 9 10 11 12 13 14 15 16 17 18 19 20 21 22 23 24 25 26 27 28 <%@ page contentType="text/html;charset=UTF-8" language="java" %> <html > <head > <title > Title</title > <script src ="js/jquery-3.6.0.min.js" > </script > <style > </style > <script > function showName ( var username = $('#username' ).val () $.getJSON ("/jsonDemo5" ,{ "username" : username, },function (data ) { if (data["msg" ] == "yes" ){ $('#info' ).css ("color" ,"green" ).html ("可以使用" ) }else { $('#info' ).css ("color" ,"red" ).html ("不可以使用" ) } }) } </script > </head > <body > <input type ="text" id ="username" onblur ="showName()" > <span id ="info" > </span > </body > </html >
SSM整合 环境说明
数据库 1 2 3 4 5 6 7 8 9 10 11 12 13 14 15 16 17 18 CREATE DATABASE `ssmbuild`;USE `ssmbuild`; DROP TABLE IF EXISTS `books`;CREATE TABLE `books` (`bookID` INT (10 ) NOT NULL AUTO_INCREMENT COMMENT '书id' , `bookName` VARCHAR (100 ) NOT NULL COMMENT '书名' , `bookCounts` INT (11 ) NOT NULL COMMENT '数量' , `detail` VARCHAR (200 ) NOT NULL COMMENT '描述' , KEY `bookID` (`bookID`) ) ENGINE= INNODB DEFAULT CHARSET= utf8 INSERT INTO `books`(`bookID`,`bookName`,`bookCounts`,`detail`)VALUES (1 ,'Java' ,1 ,'从入门到放弃' ), (2 ,'MySQL' ,10 ,'从删库到跑路' ), (3 ,'Linux' ,5 ,'从进门到进牢' );
环境搭建
1 2 3 4 5 6 7 8 9 10 11 12 13 14 15 16 17 18 19 20 21 22 23 24 25 26 27 28 29 30 31 32 33 34 35 36 37 38 39 40 41 42 43 44 45 46 47 48 49 50 51 52 53 54 55 56 57 58 59 60 61 62 63 64 65 66 67 68 69 70 71 72 73 74 75 76 77 78 79 80 81 82 83 84 85 86 87 88 89 90 91 92 93 94 95 96 97 98 99 100 101 102 103 104 105 106 107 108 109 110 111 112 113 114 115 116 <?xml version="1.0" encoding="UTF-8" ?> <project xmlns ="http://maven.apache.org/POM/4.0.0" xmlns:xsi ="http://www.w3.org/2001/XMLSchema-instance" xsi:schemaLocation ="http://maven.apache.org/POM/4.0.0 http://maven.apache.org/xsd/maven-4.0.0.xsd" > <modelVersion > 4.0.0</modelVersion > <groupId > org.thirdweek</groupId > <artifactId > ThirdWeek</artifactId > <packaging > pom</packaging > <version > 1.0-SNAPSHOT</version > <modules > <module > ssm</module > </modules > <dependencies > <dependency > <groupId > junit</groupId > <artifactId > junit</artifactId > <version > 4.13</version > <scope > test</scope > </dependency > <dependency > <groupId > mysql</groupId > <artifactId > mysql-connector-java</artifactId > <version > 8.0.29</version > </dependency > <dependency > <groupId > com.alibaba</groupId > <artifactId > druid</artifactId > <version > 1.2.8</version > </dependency > <dependency > <groupId > org.mybatis</groupId > <artifactId > mybatis</artifactId > <version > 3.5.9</version > </dependency > <dependency > <groupId > org.springframework</groupId > <artifactId > spring-webmvc</artifactId > <version > 5.3.20</version > </dependency > <dependency > <groupId > org.springframework</groupId > <artifactId > spring-jdbc</artifactId > <version > 5.3.20</version > </dependency > <dependency > <groupId > org.mybatis</groupId > <artifactId > mybatis-spring</artifactId > <version > 2.0.7</version > </dependency > <dependency > <groupId > org.aspectj</groupId > <artifactId > aspectjweaver</artifactId > <version > 1.9.5</version > </dependency > <dependency > <groupId > javax.servlet</groupId > <artifactId > javax.servlet-api</artifactId > <version > 3.0.1</version > </dependency > <dependency > <groupId > javax.servlet.jsp</groupId > <artifactId > javax.servlet.jsp-api</artifactId > <version > 2.3.3</version > </dependency > <dependency > <groupId > javax.servlet</groupId > <artifactId > jstl</artifactId > <version > 1.2</version > </dependency > <dependency > <groupId > com.alibaba</groupId > <artifactId > fastjson</artifactId > <version > 1.2.79</version > </dependency > <dependency > <groupId > org.projectlombok</groupId > <artifactId > lombok</artifactId > <version > 1.18.24</version > </dependency > </dependencies > <properties > <maven.compiler.source > 8</maven.compiler.source > <maven.compiler.target > 8</maven.compiler.target > </properties > <build > <resources > <resource > <directory > src/main/java</directory > <includes > <include > **/*.properties</include > <include > **/*.xml</include > </includes > <filtering > false</filtering > </resource > <resource > <directory > src/main/resources</directory > <includes > <include > **/*.properties</include > <include > **/*.xml</include > </includes > <filtering > false</filtering > </resource > </resources > </build > </project >
Mybatis层 db.properties
1 2 3 4 jdbc.driver =com.mysql.cj.jdbc.Driver jdbc.url =jdbc:mysql://localhost:3306/ssmbuild jdbc.username =root jdbc.password =root
mybatis-config
1 2 3 4 5 6 7 8 9 10 11 12 <?xml version="1.0" encoding="UTF-8" ?> <!DOCTYPE configuration PUBLIC "-//mybatis.org//DTD Config 3.0//EN" "http://mybatis.org/dtd/mybatis-3-config.dtd" > <configuration > <typeAliases > <package name ="com.pojo" /> </typeAliases > <mappers > <package name ="com.dao" /> </mappers > </configuration >
mapper
1 2 3 4 5 6 7 8 9 10 11 12 13 14 15 16 17 18 19 20 21 22 23 package com.dao;import com.pojo.Books;import org.apache.ibatis.annotations.Param;import org.apache.ibatis.annotations.Select;import java.util.List;import java.util.Map;public interface BooksMapper { int addBook (Books books) ; int deleteBookById (@Param("bookId") int bookId) ; int updateBook (Books books) ; List<Books> selectBooks (Map<String,Object> maps) ; }
mapper.xml
1 2 3 4 5 6 7 8 9 10 11 12 13 14 15 16 17 18 19 20 21 22 23 24 <?xml version="1.0" encoding="UTF-8" ?> <!DOCTYPE mapper PUBLIC "-//mybatis.org//DTD Mapper 3.0//EN" "http://mybatis.org/dtd/mybatis-3-mapper.dtd" > <mapper namespace ="com.dao.BooksMapper" > <select id ="selectBooks" parameterType ="map" resultType ="books" > select * from books <where > <if test ="bookId != null" > and bookId = #{bookId} </if > </where > </select > <delete id ="deleteBookById" parameterType ="int" > delete from books where bookID = #{bookId} </delete > <insert id ="addBook" parameterType ="books" > insert into books(bookName, bookCounts, detail) values(#{bookName},#{bookCounts},#{detail}); </insert > <update id ="updateBook" parameterType ="books" > update books set bookName = #{bookName},bookCounts = #{bookCounts},detail = #{detail} where bookID = #{bookId}; </update > </mapper >
Service层 接口
1 2 3 4 5 6 7 8 9 10 11 12 13 14 15 16 17 18 19 20 21 22 23 24 package com.service;import com.dao.BooksMapper;import com.pojo.Books;import java.util.List;import java.util.Map;public interface BooksService { void setBooksMapper (BooksMapper booksMapper) ; int addBook (Books books) ; int deleteBookById (int bookId) ; int updateBook (Books books) ; List<Books> selectBooks (Map<String,Object> maps) ; }
实现类
1 2 3 4 5 6 7 8 9 10 11 12 13 14 15 16 17 18 19 20 21 22 23 24 25 26 27 28 29 30 31 32 33 34 35 36 package com.service;import com.dao.BooksMapper;import com.pojo.Books;import java.util.List;import java.util.Map;public class BooksServiceImpl implements BooksService { private BooksMapper booksMapper; public void setBooksMapper (BooksMapper booksMapper) { this .booksMapper = booksMapper; } @Override public int addBook (Books books) { return booksMapper.addBook(books); } @Override public int deleteBookById (int bookId) { return booksMapper.deleteBookById(bookId); } @Override public int updateBook (Books books) { return booksMapper.updateBook(books); } @Override public List<Books> selectBooks (Map<String,Object> maps) { return booksMapper.selectBooks(maps); } }
Spring dao层
1 2 3 4 5 6 7 8 9 10 11 12 13 14 15 16 17 18 19 20 21 22 23 24 25 26 27 28 <?xml version="1.0" encoding="UTF-8" ?> <beans xmlns ="http://www.springframework.org/schema/beans" xmlns:xsi ="http://www.w3.org/2001/XMLSchema-instance" xmlns:context ="http://www.springframework.org/schema/context" xsi:schemaLocation ="http://www.springframework.org/schema/beans http://www.springframework.org/schema/beans/spring-beans.xsd http://www.springframework.org/schema/util https://www.springframework.org/schema/util/spring-util.xsd http://www.springframework.org/schema/context https://www.springframework.org/schema/context/spring-context.xsd" > <context:property-placeholder location ="classpath:db.properties" /> <bean id ="dataSource" class ="com.alibaba.druid.pool.DruidDataSource" > <property name ="driverClassName" value ="${jdbc.driver}" /> <property name ="url" value ="${jdbc.url}" /> <property name ="username" value ="${jdbc.username}" /> <property name ="password" value ="${jdbc.password}" /> </bean > <bean id ="sqlSessionFactory" class ="org.mybatis.spring.SqlSessionFactoryBean" > <property name ="dataSource" ref ="dataSource" /> <property name ="configLocation" value ="classpath:mybatis-config.xml" /> </bean > <bean class ="org.mybatis.spring.mapper.MapperScannerConfigurer" > <property name ="sqlSessionFactoryBeanName" value ="sqlSessionFactory" /> <property name ="basePackage" value ="com.dao" /> </bean > </beans >
service层
1 2 3 4 5 6 7 8 9 10 11 12 13 14 15 16 <?xml version="1.0" encoding="UTF-8" ?> <beans xmlns ="http://www.springframework.org/schema/beans" xmlns:xsi ="http://www.w3.org/2001/XMLSchema-instance" xmlns:context ="http://www.springframework.org/schema/context" xsi:schemaLocation ="http://www.springframework.org/schema/beans http://www.springframework.org/schema/beans/spring-beans.xsd http://www.springframework.org/schema/context https://www.springframework.org/schema/context/spring-context.xsd" > <context:component-scan base-package ="com.service" /> <bean id ="booksService" class ="com.service.BooksServiceImpl" > <property name ="booksMapper" ref ="booksMapper" /> </bean > <bean id ="transactionManager" class ="org.springframework.jdbc.datasource.DataSourceTransactionManager" > <property name ="dataSource" ref ="dataSource" /> </bean > </beans >
Spring MVC层 1 2 3 4 5 6 7 8 9 10 11 12 13 14 15 16 17 18 19 20 21 22 23 24 25 26 27 28 29 30 31 <?xml version="1.0" encoding="UTF-8" ?> <beans xmlns ="http://www.springframework.org/schema/beans" xmlns:xsi ="http://www.w3.org/2001/XMLSchema-instance" xmlns:context ="http://www.springframework.org/schema/context" xmlns:mvc ="http://www.springframework.org/schema/mvc" xsi:schemaLocation ="http://www.springframework.org/schema/beans http://www.springframework.org/schema/beans/spring-beans.xsd http://www.springframework.org/schema/context https://www.springframework.org/schema/context/spring-context.xsd http://www.springframework.org/schema/mvc https://www.springframework.org/schema/mvc/spring-mvc.xsd" > <context:component-scan base-package ="com.controller" /> <context:component-scan base-package ="com.interceptor" /> <mvc:annotation-driven > <mvc:message-converters > <bean class ="org.springframework.http.converter.StringHttpMessageConverter" > <property name ="defaultCharset" value ="UTF-8" /> </bean > </mvc:message-converters > </mvc:annotation-driven > <mvc:default-servlet-handler /> <mvc:interceptors > <mvc:interceptor > <mvc:mapping path ="/inter/**" /> <bean class ="com.interceptor.MyInterceptor" /> </mvc:interceptor > </mvc:interceptors > </beans >
合并所有spring配置
1 2 3 4 5 6 7 8 <?xml version="1.0" encoding="UTF-8" ?> <beans xmlns ="http://www.springframework.org/schema/beans" xmlns:xsi ="http://www.w3.org/2001/XMLSchema-instance" xsi:schemaLocation ="http://www.springframework.org/schema/beans http://www.springframework.org/schema/beans/spring-beans.xsd" > <import resource ="classpath:spring-dao.xml" /> <import resource ="classpath:spring-service.xml" /> <import resource ="classpath:spring-mvc.xml" /> </beans >
controller层
1 2 3 4 5 6 7 8 9 10 11 12 13 14 15 16 17 18 19 20 21 22 23 24 25 26 27 28 29 30 31 32 33 34 35 36 37 38 39 40 41 42 43 44 45 46 47 48 49 50 51 52 53 54 55 56 57 58 59 60 61 62 63 64 65 66 67 68 69 70 71 72 73 74 75 76 77 78 package com.controller;import com.pojo.Books;import com.service.BooksService;import org.springframework.stereotype.Controller;import org.springframework.ui.Model;import org.springframework.web.bind.annotation.*;import javax.annotation.Resource;import java.util.HashMap;import java.util.List;import java.util.Map;@Controller @RequestMapping("/books") public class BooksController { @Resource(name = "booksService") private BooksService booksService; @RequestMapping("/selectAll") public String seelectAllBooks (Model model) { List<Books> booksList = booksService.selectBooks(null ); model.addAttribute("booksList" ,booksList); return "forward:/allBooks.jsp" ; } @RequestMapping("/deleteById/{bookId}") public String deleteBookById (@PathVariable int bookId) { int i = booksService.deleteBookById(bookId); if (i > 0 ){ return "redirect:/books/selectAll" ; }else { return "" ; } } @RequestMapping("/deleteById2/{bookId}") @ResponseBody public String deleteBookById2 (@PathVariable int bookId) { int i = booksService.deleteBookById(bookId); if (i > 0 ){ return "{\n" + " \"info\" : \"yes\",\n" + " }" ; }else { return "{\n" + " \"info\" : \"error\",\n" + " }" ; } } @RequestMapping(value = "/toAdd",method = RequestMethod.POST) public String toAddBook (Books books) { int num = booksService.addBook(books); if (num > 0 ){ return "redirect:/books/selectAll" ; }else { return "" ; } } @RequestMapping(value = "/toUpdate",method = RequestMethod.GET) public String selectBookById (@RequestParam("bookId") int bookId,Model model) { Map map = new HashMap (); map.put("bookId" ,bookId); Books books = (Books) booksService.selectBooks(map).get(0 ); model.addAttribute("book" ,books); return "forward:/updateBook.jsp" ; } @RequestMapping(value = "/updateBooks",method = RequestMethod.POST) public String updateBook (Books book) { booksService.updateBook(book); return "redirect:/books/selectAll" ; } }
web.xml
1 2 3 4 5 6 7 8 9 10 11 12 13 14 15 16 17 18 19 20 21 22 23 24 25 26 27 28 29 30 31 <?xml version="1.0" encoding="UTF-8" ?> <web-app xmlns ="http://xmlns.jcp.org/xml/ns/javaee" xmlns:xsi ="http://www.w3.org/2001/XMLSchema-instance" xsi:schemaLocation ="http://xmlns.jcp.org/xml/ns/javaee http://xmlns.jcp.org/xml/ns/javaee/web-app_4_0.xsd" version ="4.0" > <servlet > <servlet-name > dispatcherServlet</servlet-name > <servlet-class > org.springframework.web.servlet.DispatcherServlet</servlet-class > <init-param > <param-name > contextConfigLocation</param-name > <param-value > classpath:applicationContext.xml</param-value > </init-param > <load-on-startup > 1</load-on-startup > </servlet > <servlet-mapping > <servlet-name > dispatcherServlet</servlet-name > <url-pattern > /</url-pattern > </servlet-mapping > <filter > <filter-name > characterEncodingFilter</filter-name > <filter-class > org.springframework.web.filter.CharacterEncodingFilter</filter-class > <init-param > <param-name > encoding</param-name > <param-value > utf-8</param-value > </init-param > </filter > <filter-mapping > <filter-name > characterEncodingFilter</filter-name > <url-pattern > /*</url-pattern > </filter-mapping > </web-app >
JSP页面略
总结 至底向上配置,一层一层依次依赖
拦截器使用 拦截器配置方式 在MVC配置文件内
1 2 3 4 5 6 7 8 9 10 11 12 13 14 15 16 17 18 19 20 21 22 23 24 25 26 27 28 29 30 31 <?xml version="1.0" encoding="UTF-8" ?> <beans xmlns ="http://www.springframework.org/schema/beans" xmlns:xsi ="http://www.w3.org/2001/XMLSchema-instance" xmlns:context ="http://www.springframework.org/schema/context" xmlns:mvc ="http://www.springframework.org/schema/mvc" xsi:schemaLocation ="http://www.springframework.org/schema/beans http://www.springframework.org/schema/beans/spring-beans.xsd http://www.springframework.org/schema/context https://www.springframework.org/schema/context/spring-context.xsd http://www.springframework.org/schema/mvc https://www.springframework.org/schema/mvc/spring-mvc.xsd" > <context:component-scan base-package ="com.controller" /> <context:component-scan base-package ="com.interceptor" /> <mvc:annotation-driven > <mvc:message-converters > <bean class ="org.springframework.http.converter.StringHttpMessageConverter" > <property name ="defaultCharset" value ="UTF-8" /> </bean > </mvc:message-converters > </mvc:annotation-driven > <mvc:default-servlet-handler /> <mvc:interceptors > <mvc:interceptor > <mvc:mapping path ="/inter/**" /> <bean class ="com.interceptor.MyInterceptor" /> </mvc:interceptor > </mvc:interceptors > </beans >
拦截器编写 1 2 3 4 5 6 7 8 9 10 11 12 13 14 15 16 17 18 19 20 21 22 23 24 25 26 27 28 29 package com.interceptor;import org.springframework.web.servlet.HandlerInterceptor;import javax.servlet.http.HttpServletRequest;import javax.servlet.http.HttpServletResponse;import javax.servlet.http.HttpSession;public class MyInterceptor implements HandlerInterceptor { @Override public boolean preHandle (HttpServletRequest request, HttpServletResponse response, Object handler) throws Exception { if (request.getRequestURI().contains("login" )||request.getRequestURI().contains("doLogin" )) { System.out.println(request.getRequestURI()+"放行" ); return true ; } HttpSession session = request.getSession(); if (session.getAttribute("username" ) != null ){ System.out.println(request.getRequestURI()+"放行" ); return true ; } System.out.println(request.getRequestURI()+"拦截" ); request.getRequestDispatcher("/interDemo/login.jsp" ).forward(request,response); return false ; } }
这里我们实现了对非登录用户的拦截,对于已登录用户,在session中会存储当前用户信息
1 2 3 4 5 6 7 @RequestMapping("/login") public String login (String username, String password, HttpSession session) { System.out.println(username+password); session.setAttribute("username" ,username); session.setAttribute("password" ,password); return "redirect:/inter/success" ; }
文件上传下载 依赖 1 2 3 4 5 6 7 8 9 10 11 12 <dependency > <groupId > javax.servlet</groupId > <artifactId > javax.servlet-api</artifactId > <version > 4.0.1</version > </dependency > <dependency > <groupId > commons-fileupload</groupId > <artifactId > commons-fileupload</artifactId > <version > 1.4</version > </dependency >
文件上传 单文件 页面
1 2 3 4 5 6 7 8 9 10 11 12 13 <%@ page contentType="text/html;charset=UTF-8" language="java" %> <html> <head> <title>文件上传</title> </head> <body> <form action="${ctx}/upload" method="post" enctype="multipart/form-data" > 文件1 :<input type="file" name="file" > <input type="submit" value="上传" > </form> <a href="${ctx}/download" >点击下载</a> </body> </html>
Controller
1 2 3 4 5 6 7 8 9 10 11 12 13 14 15 16 17 18 19 20 21 22 23 24 25 26 27 28 29 30 31 32 33 34 35 36 37 38 39 @RequestMapping(value = "/upload",method = RequestMethod.POST) public String fileUpload (@RequestParam("file") CommonsMultipartFile file, HttpServletRequest request) { String fileName = file.getOriginalFilename(); if ("" .equals(fileName)) return "redirect:/index.jsp" ; System.out.println("fileName:" +fileName); String path = request.getServletContext().getRealPath("/files" ); File myFile = new File (path); File uploadFile = new File (path,fileName); System.out.println("uploadFile:" +uploadFile); if (!myFile.exists()){ myFile.mkdir(); } try { InputStream inputStream = file.getInputStream(); OutputStream outputStream = new FileOutputStream (uploadFile); byte [] bytes = file.getBytes(); int length = bytes.length; outputStream.write(bytes,0 ,length); outputStream.close(); inputStream.close(); } catch (IOException e) { e.printStackTrace(); } return "redirect:/index.jsp" ; }
注释的是我第一次的写法,第二次更改我把inputStream省略了,直接让outputStream写出了整个文件,但并未对InputStream创建和关闭省略掉(嗯。。就试试,懒得改了,另一种用法)。
多文件 页面
1 2 3 4 5 6 7 8 9 10 11 12 13 14 <%@ page contentType="text/html;charset=UTF-8" language="java" %> <html> <head> <title>文件上传</title> </head> <body> <form action="${ctx}/upload" method="post" enctype="multipart/form-data" > 文件1 :<input type="file" name="file" > 文件2 :<input type="file" name="file" > <input type="submit" value="上传" > </form> <a href="${ctx}/download" >点击下载</a> </body> </html>
Controller
1 2 3 4 5 6 7 8 9 10 11 12 13 14 15 16 17 18 19 20 21 22 23 24 25 26 27 28 29 30 31 32 33 34 35 36 37 @RequestMapping(value = "/uploadFiles",method = RequestMethod.POST) public String filesUpload (@RequestParam("file") CommonsMultipartFile[] files, HttpServletRequest request) { for (CommonsMultipartFile file : files) { String fileName = file.getOriginalFilename(); if ("" .equals(fileName)) return "redirect:/index.jsp" ; System.out.println("fileName:" +fileName); String path = request.getServletContext().getRealPath("/files" ); File myFile = new File (path); File uploadFile = new File (path,fileName); System.out.println("uploadFile:" +uploadFile); if (!myFile.exists()){ myFile.mkdir(); } try { InputStream inputStream = file.getInputStream(); OutputStream outputStream = new FileOutputStream (uploadFile); int length = 0 ; byte [] arr = new byte [1024 ]; while ((length = inputStream.read(arr)) != -1 ){ outputStream.write(arr,0 ,length); outputStream.flush(); } outputStream.close(); inputStream.close(); } catch (IOException e) { e.printStackTrace(); } } return "redirect:/index.jsp" ; }
其实就是对接收的file数组循环写入
文件下载 1 <a href ="${ctx}/download" > 点击下载</a >
Controller
1 2 3 4 5 6 7 8 9 10 11 12 13 14 15 16 17 18 19 20 21 22 23 24 25 26 27 28 29 30 31 32 @RequestMapping(value = "/download",method = RequestMethod.GET) @ResponseBody public String downFile (HttpServletRequest request, HttpServletResponse response) throws Exception { String path = request.getServletContext().getRealPath("/files" ); String fileName = "课表.jpg" ; response.reset(); response.setCharacterEncoding("UTF-8" ); response.setContentType("multipart/form-data" ); response.setHeader("Content-Disposition" , "attachment;fileName=" + URLEncoder.encode(fileName, "UTF-8" )); File file = new File (path,fileName); InputStream inputStream = new FileInputStream (file); OutputStream outputStream = response.getOutputStream(); byte [] buff = new byte [1024 ]; int index; while ((index = inputStream.read(buff)) != -1 ){ outputStream.write(buff,0 ,index); outputStream.flush(); } outputStream.close(); inputStream.close(); return null ; }
RESTful风格文件下载 仅作补充,因为我直接{fileName}也没有问题!。。。
1 @RequestMapping(value = "/download/{fileName:.+}",method = RequestMethod.GET)
restFul 风格一般会把文件后缀名截取掉, 加上 :.+ 来保留文件后缀名